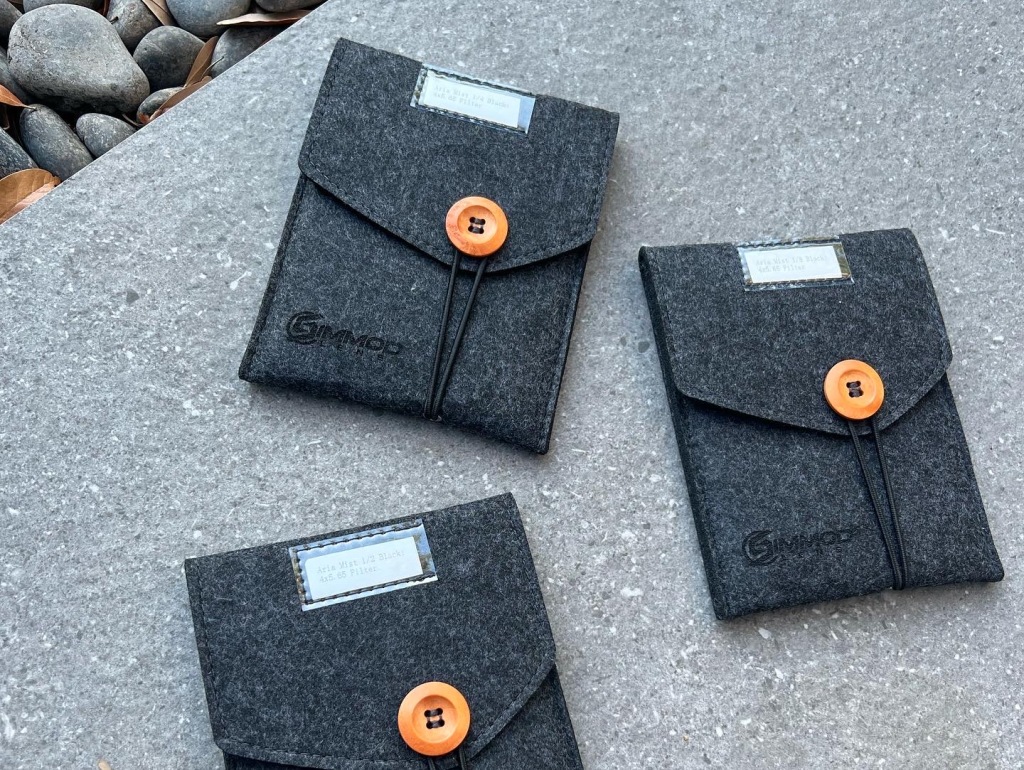
OMG…It’s an OM-D – *Warning. Geeky camera review follows….

1/4000 sec @ F5.0 iso 200. 45mm Olympus.

1/4000 sec @ f1.8 iso 200. 45mm Olympus

Actually, it’s an Olympus OM-D E-M5….sexy name no ?

I’ve taken to calling it the OMG….

Now, I’m not one to do a review about a camera, even less so of a stills camera, but I feel like I need to shout about this one.  It’s really changed the way that I take photos on set.  And that to me is really interesting.  it’s not that it’s a *better* camera as such…It’s just enable me to photograph in a different way.

1/500 sec @ f1.8 iso 200. 45mm Olympus

1/1250 sec @ f2.8 iso 200. 45mm Olympus

1/500 sec @ f2.5 iso 1250. 45mm Olympus

First, the backstory…

Olympus….why ???

I’ve been using this most uncool camera brand since they first started making digital SLR cameras.  In my line of work as a cinematographer, Canon dominates. And if you’re an outsider, maybe you use Nikon.   And it’s easy to see why.  Canon, with their 5Dmk2 made it easily and affordable to get large sensor video. So it’s an easy choice for a cinematographer.

1/200 sec @ f 2.8 iso 1600. 45mm Olympus.

I think I’m the only DOP in Sydney that DOESN”T have a 5 or 7D canon.

But I use my camera to take photos, not to also shoot video.  And that’s a really important distinction to make.

I bought my very first digital stills camera wayyyy back in 2004.  It was an Olympus E1.  Until then I was a Contax film man.    Back then it was the first digital camera I’d used that actually behaved like a *real* camera.  There wasn’t a long delay between taking a picture and the picture being taken and it had a fantastic Kodak sensor.

In a time when people didn’t even think to ask where the sensor came from, the Olympus produced magnificent colours and seemed to punch above it’s weight for a 5mp camera.

1/60 @ f5. iso 200. 45mm Olympus

1/100 sec @ f1.8 iso 200. 45mm Olympus

1/320 @ f3.2 iso 1600 45mm Olympus

1/1250 @ f1.8 iso 400. Olympus 45mm

1/160 @ f2.2. iso 1600. 45mm Olympus

And it was a tank.  I have seriously abused that camera and it never stopped working.  I managed to break few bits off it, but I still use the camera today and it still takes some great shots.

In late 2010, I bought another Olympus, the E5.  Like the E1, it was a serious tank of a camera.  You could easily use it to pound in tent pegs.

I also went mad and bought a lot of expensive Olympus SHG lenses.  These lenses are simply optically extraordinary.  They are also, like the E series Olympus cameras, pretty much waterproof.   At the time it seemed like a good idea.  I’d also bought two Panasonic AF100 video cameras for use on the second series of the TV series Offspring.  On the first season we’d used the 5Dmk2 and I wasn’t happy with the results we were getting, and so I switched to AF100 cameras.

To go with the AF100, I also bought two m4.3 lenses, the Panasonic Lumix 30mm F1.7 and the Panasonic Lumix 14mm F2.5, both of which work on the OM-D.

1/60 sec @ f2.5 iso 640. 14mm Lumix

1/320 sec @ f5.6 iso 200. 14mm Lumix

1/800 sec @ f2.8 iso 200. 45mm Olympus

The AF100 was a m4/3 camera and I could use my new SHG 4/3 lenses on it, and get a little rental on it so it seemed like a great idea.

So on set I’ve been dragging my huge but magnificent 4/3 camera around.  The E5 is a great camera but it started to suddenly be a pain because, the thing is actually not much smaller than a 5D.  With an SHG lens and a battery grip, I was suddenly carrying something that was as large as the camera of the on set stills photographer !

Not only that but it was becoming intimidating.  I could sense people’s discomfort as I lifted the big 35-100 F2 Olympus zoom to grab a shot.  There’s nothing discrete about this rig.

Mainly I try to steal a shot just before we go for a take and I’ll just throw the camera at my assistant as we roll up.  But it’s hard to fly under the radar with an E5 and SHG lenses.  Despite the original promise of 4/3, they just haven’t ended up that small.

1/60 sec @ f 1.8 ISO 1000. 20mm Lumix

In pre production for a new series with director Glendyn Ivin, I began to realize that I really wanted to have a camera that would be as discrete as his beautiful Leica M9/M8 kit.

1/100 sec @ F1.8, ISO 200. 45mm Olympus

Glendyn takes some magnificent photographs and whilst I’m sure the Leica helps, he has a great eye and the M series form factor certainly helps his shooting style. for a crazy moment i thought about just buying an M series.  But they are astronomically expensive.  I’m not quite ready to spend that kind of outlay, and I also saw some of the limitations of the camera.  It certainly isn’t very good in low light or even, dim light.

1/1250 sec @F1.8 ISO200. 20mm Lumix

I’d thought about going for a m4/3 camera like the Panasonic GH2.  It would be able to use my 4/3 lenses with an adaptor but the camera hadn’t impressed me much for it’s feel and usability.

I then started hearing rumors about a new Olympus. And while I had looked at a PEN, they had always seemed a little *toy* for me.  But a new m4/3 camera was on it’s way.

The OM-D E-M5.

Supposedly the first of a range of new m4/3 cameras discreet from the PEN series Olympus cameras, the OM D is a total joy.  It’s almost too small for me to use and I was worried about the size with my big chunky man hands, but as it turns out it’s perfect.

This is also the first camera that I’ve had with an electronic viewfinder.  I’ve always been a bit suspicious, which is kind of dumb.  As a DOP, I’ve been looking at electronic viewfinders for almost all of my career.

The viewfinder is great and I had a nice “ah ha” moment when I realised I could very easily customise what was actually displayed in the viewfinder.  You can have info displayed across the bottom or overlaid over the image itself.  I chose the former as I preferred a less cluttered image for composing.

1/320 sec @ f2 iso 200. 45mm Olympus

1/200 sec @ f1.8 iso 800. 20mm Lumix

1/200 sec @ f1.8 iso 800. 20mm Lumix

1/160 @ f1.8 iso 1600. 45mm Olympus

The screen on the back is nice but I’ve been preferring to use the viewfinder.  I still like composing in this way.  It’s nice to have the live view option, but in truth I rarely use it.

And the other upside to using an EVF is that you get exposure information without having to take a shot.  I’m so used to taking a shot, looking at the shot back with a histogram and then adjusting exposure.  The exposure info in the viewfinder means I can check BEFORE i take the first shot.  A great time saver for me.

The AF is crazy fast.  I’ve been mainly using the 45mm 1.8 Olympus I bought with the camera.  I’ve also been using the Panasonic 20mm 1.7 and the Panasonic 14mm 2.5 as well, and they aren’t quite as snappy, but they are certainly fast enough.

1/4000 @ f3.2 iso 200. 100mm 35-100 F2 SHG.

I have also been using my SHG lenses with the adaptor.  Whilst it’s nice to be able to put some of these fine lenses on the body, it’s borderline unusable for AF to me and they don’t seem to focus as accurately.  I certainly seem to have more mis-focused shots with the SHG lenses on.  I mainly shoot people and the AF is just not reactive enough.  For more static subjects it can work OK if you don’t mind the delay and that’s not as important.

1.2500 @ f 4 iso 200. 93mm 35-100 F2 SHG

After my fist outings with the 4/3 lenses on I realised how high the AF success rate was for the camera when using the m4/3 lenses.  Mostly it nails the AF each time and it also seems to pick what I want.

1/500 sec @ f2.2 iso 800. 20mm Lumix

I have been using the face recognition system and was even more perplexed to see you can even specify eyes, and even WHICH eye…right eye or left eye !!

I turned it on, not expecting it to work, but I have to say, I’ve never had a such a high proportion of in focus and with exactly the right bits in focus shots out of any camera.

1/320 @ f2.2 iso 800. 45mm Olympus

So now I leave it with face recognition on and eyes selected.  What I still haven’t really worked out is how that interacts with the AF pattern as I move it around.  So I can move the AF selection area around, but then it still picks up faces as well.  I thought for a while it would preference the face if it was close or within the AF target I’d chosen, but now I’m not so sure.  Let me know if you know the answer to this.

1/80 @ f1.8 iso 3200. 45mm Olympus

I actually pre-ordered the HLD-6 grip as well, assuming I’d want it for use with the 4/3 lenses and to bulk the camera up.  It took a couple of weeks to show up and I was forced to use the camera without it.

I have to say the grip is now staying off the camera mostly. The thing is so small, I can easily carry it around.  I’m taking a lot more shots because I actually have the camera with me.  I’m shooting though entire takes with it on my shoulder.  It’s no issue at all to have it on my person all the time.

And that’s what’s really exciting about this camera.

it’s a very capable camera image wise, that’s built robustly enough for me to not care too much about it getting a few knocks and it’s fast enough for me to shoot with very quickly and it’s really discrete. I’ve noticed my subjects don’t tend to have the same uneasy reaction as when I pull out the big bertha.

I haven’t turned on my E5 for a few weeks now.  I almost started thinking about selling it.  I won’t for the moment though because it works so well with the SHG lenses and this is one of the OM D’s few shortcomings.

And while we’re at it…the battery sucks.  It doesn’t last me the day at all.  It seems to be good for 300-350 shots.  I guess i’d be OK with this but I can’t even buy a second battery for it at the moment as Olympus Australia seem to be out of stock of them.  I’ve ordered three more !!

One other very very slight issue I’ve noticed as well is that it seems to me there could be a teeny tiny less latency between a button push and a shot being taken.  A few times I’ve gone for the *moment* to find I’m a bit late with the shot.  I’ve adjusted to try and anticipate a little, but it would be nice if the shutter realise was a little more reactive.

I’ve also been stumped a few times when the eye sensor of the VF seems to mistake my hand on the touch screen as I review images.  As I’m scrolling images it suddenly blacks the screen and switches the viewfinder on.  Annoying.

Now, the shots….

I’ve been using Lightroom and they often come in looking so good, i really don’t know what else to do in terms of grading.  I’ve been shooting RAW and going as high as ISO 3200.  They’re pretty useable up to that range and the sensor seems to have a lot more DR than my E5.  I haven’t done any empirical testing but it’s able to cope with high contrast scenes very nicely.

RAW from camera. 1/1600 @ f2.8 iso 1600. 45mm Olympus.

Graded in Lightroom.  note how much highlight detail was recovered.

I haven’t used any of the art or scene modes.  Mostly I actually shoot manual and it’s nice to see those there, but they aren’t my bag.  I like simple.

I’ve been mainly leaving the IS switched ON, even though the purist in me worries about the sensor moving while I’m exposing my shot !  It does seem to do a magnificent job and I haven’t noticed any tradeoffs yet.

1/80 sec @ f1.8 iso 3200. 45mm Olympus

1/15 sec @ f1.7 iso 800. 20mm Lumix

1/6 sec ( handheld ) @ f1.7 iso 3200. 20mm Lumix

Even the video is quite good, but as usual, Olympus have crippled it by only offering 30 FPS.  HELLO OLYMPUS..the rest of the world shoots 25 FPS and 24 FPS !!

1/160 @ f1.8 iso 400. 45mm Olympus

1/250 sec @ f2.8 iso 200. 45mm Olympus

Basically, I’m in love with this camera.  It’s bringing me a lot of joy and what’s more, the fact that i’m carrying it with me everywhere means I’m shooting a lot more as well.  The AF is fast, the little 45mm lens is super sweet and it’s allowing me to shoot in a way that I wasn’t able to before.

No it’s not a Leica M9 and maybe one day I’ll go there, but I really am enjoying this style of shooting.

Go to FLICKR for high res versions of these shots

Posted in Equipment | Tagged , , , , , , , , | 7 Comments

Cool blog on continuity

You think Continuity isn’t cool ?

Check out this blog by Script Supervisor Sabi Paisa.  Try and watch these clips without reading her text first and see if you can beat the tests she’s got there.

It’s a very scientific approach to something that’s normally considered a more mundane vocation.

Posted in Philosophy | Tagged , | 3 Comments

Wider Frame Grabs

Here’s another frame grab.

In this setup, I used NO LIGHTING whatsoever.  It’s natural only.  No gels on the windows.  That’s sunlight back there.  Look at how much dynamic range there is.  You can see out the windows and into the black of her dress.  As before, this is with a prototype camera that has a few dead pixels that haven’t been corrected.  The noise is also from an uncalibrated sensor, so that will change significantly once that’s done as well.

This was shot with a compact prime, the 25mm at 800 ISO.  There’s a slight milkiness to her dress which I think comes from veiling flare from the hot window to the right of frame, not something that’s unusual in a  high contrast situation like this.

Ungraded frane grab form Resolve


Leah Wide. My Grade

Posted in Equipment | Tagged , , , | 40 Comments

Frame Grabs for Leah

As promised, a comparisons of the RAW and my version of a grade of Leah. The windows aren’t gelled ( a few have asked) and I had a 1.2 K HMI though a window and then through  two frames of diffusion on camera right.  A bit of negative fill on camera left and then some poly on far camera right.

Leah Ungraded

My graded version of Leah

Posted in Equipment | Tagged | 40 Comments

Another Blackmagic Clip

Wow.  I’ve had a lot of traffic over the last couple of days !  There’s a huge amount of interest in the camera !

I’ve been given the green light to reveal another clip.  This is from another early shoot, again with a prototype camera.  If you look carefully you’ll notice some stuck pixels, but what’s really exciting here is the dynamic range !  You can clearly see out the window and the levels inside were a fair bit down on that. There’s still fine detail in the darker fabric of her dress as well.  The noise is still very much a work in progress.  Please don’t take this as an example of the finished product.  The engineers are working on sensor calibration right now and this should improve dramatically.

Also there’s a lot of fine detail here.  You can see the individual hairs on the right hand side of her head, and there’s great detail in her skin (Sorry Leah !)

Once again, I graded this myself so in the hands of someone more skilled in Resolve could do a lot better !

Our talent, Leah, was lit by a single 1.2K HMI through a frame of 216 on camera right.  I had a 4×4 Poly doing a passive bounce from camera left and a bit of anti- fill between me and the poly.

I’ll post the ungraded stills again from this clip but Enjoy !

Posted in Equipment | Tagged , , , , | 53 Comments

Blackmagic Cinema Camera – Let’s take it from the top

If you’re keen to look at the clips directly in vimeo, then click HERE

It’s a once in a lifetime chance to be involved with something as big as this.  I was approached in late 2011 to be a part of something that every cinematographer dreams of…building a new camera.

I’ve known the guys and owners of Blackmagic since they started the company (and also the company before that)

BMD Engineering Test Shoot. Camera has a Zacuto Rails setup, Arri FF and Mattebox.

BMD have always been a post company.  And they’ve been incredibly successful, literally revolutionising and enabling a whole new generation of filmmakers and producers of media.  Their model of really high quality and incredible low cost meant they quickly became leaders in the field.  They have alway gone for uncompressed and high end for ridiculously low cost.  I’d hate to be in competition with them !

I was actually at the service of my great mentor John Bowring when I bumped into them.  They’d recently acquired DaVinci and adapted their model to it.  As a cinematographer, it was great to see a tool I’m so familiar with, the awesome colour correction tool that DaVinci is, get a new life, thanks to BMD.

I joked with the guys that they should look at doing a camera, now that they had all the post pathways to do a RAW based camera.  Just before Xmas I was summoned to the BMD offices for a special presentation.  I’d have to sign the usual NDA’s.  At the time, I’d actually been pestering them to do an Arri RAW recorder for the Alexa.  I assumed that’s what they were going to show me.

I couldn’t have been more wrong.  What they showed me totally blew me away….

BMD aren’t just a company that does post production gear anymore.  They are very firmly in the business of doing production gear.

Starting with the Blackmagic Cinema Camera, BMD are now a camera company.

I was handed a prototype of the camera and I saw a powerpoint presentation detailing it’s very impressive specs. The real jaw dropper was the price.  It was kind of ludicrous.  I didn’t know where to start.  The body shape of the camera took me a while to come at.  It was fairly unconventional and radical.

BMD Engineering Shoot

After a while, I started to think of it as being ultra cool, something between modernist and retro.  It felt pretty good in my hands.  It was certainly solid and hefty.  I wondered about it’s ergonomics, but in a way, it’s simple shape and elegance are it’s strength.  It could easily be pimped up if you want extra handles, mounting brackets shoulder rigs etc.

In fact, it really was a simple as a camera could be.  A box, with a screen, a sensor and a lens mount.  It doesn’t get more basic than that does it ?

Everything else can be added…if you want…or you can go simple and naked.

It’s worth mentioning who I think will love this camera.  In a way, this is not a camera for DOP’s and working cinematographers like me.  This is a camera for the masses.  This is a camera for everyone that’s bought a canon 5Dmk2 or a GH2 and wanted more than what a “consumer” camera can do.  This is a camera for those that can’t afford a scarlet or EPIC or a C300.

The main sticking point for these dSLR consumer cameras is their data-rate limiting bottleneck of compression.

Compression and bit depth is the natural enemy of awesomely grade-able pictures.  As anyone who’s tried to grade .264 originated material knows…it’s great if you’re happy with what comes out of the camera, but as soon as you want to “do” anything with it, then you’re really screwed.

“do” anything could mean, simple or complex grading.  Pulling a secondary, doing a key, or any kind of layered VFX work.  It’s a compromise….big time.

So now there’s even a big market for data based external recorders that can record either the HDMI or SDI if it has it out of the camera and to try and have less compression.  In fact, even BMD do one of these recorders, the Hyperdeck Shuttle.

BMD Engineering Test Shoot.

The camera itself has a 2.5K sensor.  Now I can feel a bunch of you rolling your eyes at the camera being a “mere” 2.5K.    The truth is, and this has been borne out by some recent tests I did in preproduction for a film I just shot, resolution counts, but dynamic range and compression count more.

I’d done a shootout between an EPIC @ 5K and an Arri Alexa, in both RAW@2.6K and ProRes (1.9K), and none in the cinema could pick the graded ProRes from the EPIC on the first viewing.  After multiple viewings, you could start to see very small differences in resolution.

Let’s not forget that the benchmark drama camera right now is the Arri Alexa.  A camera which has a sensor resolution that’s about the same as this camera.

And most of the work it’s doing in my part of the work is lowly HD 1920×1080.  The truth is, Alexa is a camera with a slightly oversized sensor size gives you a really nice downscale to 1920.  And that’s just what this the Blackmagic camera does.  It’s an oversampled 1920 and this gives still puts a lot of resolution in your hands.  Just take a look at the “Bondi” clip below.  Notice, even when replaying from vimeo, there’s a lot of fine detail in the sand and in the buildings in the background.

Having shot extensively with the EPIC and RED in drama and episodic TV, the 4K files are nice if you want to blow or crop a frame, but usually they don’t really make very much difference to the end result.  Dynamic range counts for more than pixels for most of the work I do.

BMD Engineering Shoot.

The same thing happened with the megapixel race in photographic cameras. Marketers chase numbers because consumers think it’s an easy way to compare.  Just let your eyes be the judge.  Yes 4K and beyond will sometimes make a difference, but rarely for a TV, broadcast or computer screen.  The only time it makes a difference is on the really big screen, and even then, it’s only a slight improvement.

WORKFLOW – What is RAW ?

OK, so there are two ways to shoot with this camera.  RAW, or ProRes.

Now before we go on, I want you to realise how significant this is.  We’re talking about a camera that does RAW and uncompressed.  For just $3000 bucks.  Insane.

Having an uncompressed and RAW workflow is really amazing because it gives you back the power to finesse your images with a lot more control.  You have so much more working range because a RAW workflow basically captures the images from the sensor and doesn’t really “do” anything to them.  You can choose how they look.  You as the user get to decide how far to push the look along.

Cameras like the 5Dmk2 or the C300 can be loaded with “logish” picture profiles, but you’re still limited by how much data there is for each frame. This camera doesn’t throw any of that information away to try and compress it into a smaller file size.  It’s all there for you to use if you want it.

DaVinci Frame Grab

If you don’t want that extra step of grading and transcoding your RAW images, that’s fine too.  You can “shoot to edit” by simply shooting ProRes.  You can even choose a LOG or 709 version of prores.  If you really want to be able to take the files straight from the camera and use them straight away, you can !

The camera produces really nice ProRes files that look pretty damn good straight out of the camera (and I promise I’ll show some soon!), without grading.  In this way, the camera is definitely faster to use than a h.264 style camera, because you’re shooting native ProRes and the files can be used right away without the messy transcoding steps.

Not only that, but you can enter metadata right from the camera interface that flows though to FCPX.  You can basically log in the field, and they are embedded in the camera’s files and available to FCP.

If you want really fast to work with ProRes files that retain the extra dynamic range of the camera, then you can choose to shoot LOG ProRes.  You’ll get mild compression and a lot more files saved on your SSD’s.  You get to still “shoot to grade” with the ProRes advantage of smaller files.

Then of course, you can choose RAW.  RAW simply means you get everything the camera produces.  The only thing that’s baked into this file is the white balance point.  Everything else is up for grabs.  There is no reducing image resolution or colour compression.  You get all that information and you can choose how you want it to look with the greatest range and flexibility.

It’s a wonderful new workflow that’s actually been around for a while…it’s just few used it !

DNG.  A standard developed by ADOBE for stills, and then broadened to encompass moving images as well, DNG, or CinemaDNG for the cinema version of this, is an open standard for using, storing and accessing images. Initially owned by Adobe, it’s now a freely available image standard.

When you’re shooting RAW, every frame is a DNG image file.  That means you can open them in Photoshop, and presumably everything else ADOBE like After Effects.

Graded DaVinci Resolve Frame Grab

Ungraded RAW

Resolve also supports the CinemaDNG standard as well, and can easily play the DNG files from the camera. Not only that but you get the awesome power of Resolve tightly integrated with the camera.  Resolve has been totally reworked to make it much simpler to use, in anticipation of less experienced users (like me !) wanting to use it to grade their new Blackmagic pictures.

So to recap, you can shoot RAW and get everything, or you can shoot Pro Res and get either a LOG image that gets you almost everything, or a REC709 that gets you pretty great looking pictures that can be used right out of the camera.

DaVinci Resolve Frame

Ungraded RAW

THE CAMERA MECHANICS….

First thing you’ll notice is that it’s quite heavy for it’s size.  I think that’s a good thing.  More mass means it easier to hand hold as it won’t jiggle around so much.  Yes more weight means it’s more tiring to hold, but it certainly feels solid in the hand.

There’s no viewfinder, and instead you have a touchscreen on the back and a few buttons for accessing menus and the import functions like record.

I guess there are pro’s and cons for the touchscreen.  Having used another heavily reliant touchscreen camera, the RED EPIC, it can sometimes be annoying to have to dive down through menu after menu to change a setting that you wished there was a button for.  The counter of this of course is that you get a camera like the Sony FS700 that has a bazillion little buttons all over it.

I’m hoping that BMD have got the mix just right.  I’ve put in my wish list to make the buttons customisable so that the user can then assign the buttons to functions they like.  At the moment the “focus” button operates a peaking function on the screen, but in the future, that will probably activate auto focus.  I’d like to be able to assign that button to do other things and I’m hoping the BMD guys will allow for that.

Initially it wasn’t going to have HDSDI output but thankfully that was added pretty quickly. BMD were I think, one of the first companies to release a Thunderbolt based product and the Blackmagic Cinema Camera sports one as well.  Down the track you’ll be able to use the Thunderbolt connection to allow for external recording or to connect other devices like the Ultrascope.

BMD Internal Shoot

I personally prefer a viewfinder to the LCD screen style of operating (like on the C300 where you get both) but I’m hoping it won’t be difficult to simply add a viewfinder to the camera., something that takes the SDI output or maybe even the thunderbolt connection ?  Zacuto ! Hello ?  Are you listening ?

Yes, I bet you can record the HD SDI output, but I can’t see why you would want to as the cameras internal RAW recording will be better than anything that the HDSDI output would have.  I guess if you wanted dual recording functionality ?  I’ve discussed with the BMD engineers making the colourspace of the SDI output user selectable, so you could choose a LOG or 709 image.  That seems to make the most sense to me.  The quick debayer that the camera does is pretty impressive, but I’m not so sure it would be worthy of recording when you look at the still frames themselves.

DaVinci Frame Grab

The camera uses bog standard SSD drives as media.  The kinds of drive that are powering the latest notebook and ultra book computers.   SSD’s are reliable, relatively cheap for the performance they offer and they are very readily available.  As a consumer item, their costs are on a constant downward trajectory too.

All you have to do is format them using a desktop computer and you’re good to go.  SSD’s might seem like expensive media, but you only have to look at the performance spec required by uncompressed RAW and you’ll realise that even the most ultrafast CF card is never going to cut it. Even the mighty Arri Alexa’s choice of Sony’s SxS cards start to offer similar specs, but they are a more proprietary format and insanely expensive per gig.

A 64GB SXS card is about US $680, and records about 27 mins in 4:4:4 pro res.  A 240GB SSD drive gets you about the same recording time when recording RAW and is about half the price.  Of course the record times are far greater if you’re recording to pro res as well.

Once you pop a formatted SSD drive into the camera, it reads it and you’re ready to go within 3 seconds of inserting it.  In fact powering the camera up from off and being able to record, seems to be about 10 seconds.  Pretty fast !

There are two ways to make the camera start recording.  There’s the giant record button on the front and another second record button on the deck controls on the back below the screen.  There’s a menu button for accessing all the most important camera setup info, and here you can also change camera functions like ISO, white balance and shutter angle.

You can also turn on and set functions like Zebra and the recording formats.  I’m really hoping they will add timecode input and I’ve suggested that they could detect timecode on the audio input as a way of jamming the camera.  Let’s hope they do that, but at the moment you can approximately set the timecode to TOD code by setting the date and time clock.

So I can talk about the camera for a long time…but how are the pictures ???

THE PICTURES.

Now all of these clips are my own little tests.  I have been shooting other internal engineering tests for BMD but I’m not allowed to show these yet.  What I can show you are my home movies.

So while they aren’t exactly drama, they do give you a sense of what the camera can do.  As soon as I’m allowed to show some more drama based scenes I will !

DUSK

I was pretty keen to see how she would go in low light.  I wondered out onto the main street near where I live at dusk and started shooting.   I did some iris pulls as I rolled, as I was still trying to work out how to exposure the camera.  Most of these clips are 320 and they look pretty nice.  Again I was shooting with the Leica “R” 35 prime, mostly at F2 when it gets dark towards the end.

The camera performs really nicely in low light as you can see, even at my conservative low ISO choice.  There’s plenty of dynamic range, you can see the highlights still in the sky.  It also handles the mix of colour temperatures very nicely and also, some very promising lower light scenarios towards the end.

It’s not A C300 or even a 5Dmk2 in terms of low light, but I’d argue that mostly iso1600 is enough with fast lenses.  In production, I’ve only gone to 3200 a couple of times that I can think of.  All of this was shot using the 35mm “R”

BEACH DUSK.

This was another little test shoot I took the camera on.  I was actually shooting some material and scouting locations for another shoot and we also had the C300 with us. I was with Director Glendyn Ivin as we tested the new canon for a series were shooting. (check out his awesome blog) We had a beautiful sunset and the waves were looking great.  This was pretty high contrast material.  I was loving the sun kicking off the water.  Quite a few shots were done with a 45 deg shutter to get the exposure level down enough.  I still didn’t have any exposure tools in the camera so I was still kind of guessing. The colours were changing pretty quickly as the sun went down.  Lovely orange, then pinks and blues.  The night stuff is pretty amazing.  The only illumination on the subject is the glow of the C300 screen and the tally light !  There was no street lighting around.

BONDI.

Using the nifty and very cheap Canon 15-85 (not even L series) I got some stunning images overlooking Bondi.  What amazes me about this clip is the amount of fine detail, even playing as a 264 on Vimeo.  The RAW files are simply fantastic to look at, even from a very cheap consumer grade Canon lens.

So that’s all I’m allowed to show for now.  There will be some more polished material soon I promise.

I think these are astounding pictures to have from a camera that’s only going to cost 3k.  Not only that, but the guys at BMD are only just getting started.  Already I’ve seen the camera come a very long way in a matter of months.  They also have some very cool extra features in the works which basically put the fun back into filmmaking.  I’m really excited by having a peak at what’s to come.

Sure it’s not an Alexa, but they are really trying to make something that’s complimentary to those larger cinema camera systems.  They aren’t saying you should not be using those cameras where appropriate, but they really wanted to try and offer something that was better than the consumer level dSLR cameras that are currently out there.

I think they’ve easily given us a better alternative to the dSLR cameras out there for most shooting situations.  The RAW workflow and the uncompressed recording means you’re not loosing anything.

Really, what Blackmagic have done is amazing.  They’ve given us an ultra compact sexy-as-hell 2.5K RAW uncompressed camera, with world leading colour correction software for three thousand bucks.

Posted in Equipment | Tagged , , , , , , , , , , , , , , , , , , , , , , , | 325 Comments

Lighting By Design – Tangle Series 3

Tangle is one of Australia’s most celebrated drama TV series.  Instead of the usual police, hospital, legal / crime material, Tangle instead focuses on the interconnected story of two generations and their complex family relationships across those generations. Season three will look at how the generations separate from one another and how the ties of family are stretched.

With two critically successful seasons of Tangle already having gone to air, Tangle’s creator’s and producer’s, John Edwards and Imogen Banks were keen to move the show into new territory.

The obvious thing in series TV is to not mess with the formula, to ensure that the show is consistent.  To their credit John and Imogen were keen to see what else could be done with the visual direction of the show.  They aren’t afraid to take a risk and try something new.

This would also mark the first time Emma Freeman would be setting up the show along with a designer that would be new to the show, Carrie Kennedy.  Tangle’s heritage was always that of a show that would challenge it’s audience and it was very exciting to have the chance to be involved in such a special series.

Ally (Justine Clarke) contemplates making a phone call in her new house. Available lighting only. Alexa Frame Grab

There was a number of changes from the second series in terms of locations and Carrie was heavily involved in finding more *shoot-able* locations.  The house that central character “Ally” played by Justine Clarke, ended up moving into during series 2 ended up being a very difficult location to work in for a crew and everyone wanted to find an easier location, that still suited her character.

Max (Blake Davis) and Ally (Justine Clarke) take in the view. Ultrabounce through the windows. Tungtsen Prac lamps are on just out of the top of frame. Alexa Frame Grab

As we commenced pre-production, Emma and I discussed how we wanted to approach the visual style.  Emma has an amazing connection with her cast.  She gives them a lot of time and love and it’s really important to her to create a shooting environment that prioritised the cast and their performance above all else.

Ally (Justine Clarke) is framed by her new house. Ultrabounce through windows. Alexa Frame Grab

I was also relishing the more serious themes covered by the scripts.  Having come of the rather jovial second series of Offspring, it was great to be working with material that covered darker territory.

I started to think about how we could *give* over more of the set to our cast.

Gigi (Eva Lezzaro) awakes to a surprise. Ultrabounce through windows. Alexa frame grab

I’d just done a very low budget ABC2 Series, Twentysomething in between Offspring and Tangle, and I’d ended up shooting with a lot of natural and available light.  By accident, I realised that it can often mean that you end up with a lot less hardware in the set.  It means you can give more of the set to the cast and it makes it faster to construct coverage.  Not only that, but it looked beautiful.

With a bit of help from the design department, I realised I could try and light the show using location choices and lighting from the art department, whether it was practical prop lights, lamps and pracs or even sheer curtains on windows, along with scheduling that meant we made the most of each location for the best time of day to be shooting there.

Ally (Justine Clarke) lit by sunshine on sheer curtains dressed to frame. Alexa Frame Grab

I had the very good fortune of having a very understanding designer, and Carrie was able to populate our sets with all manner of lighting assistance.

Word got out that “we weren’t using any lights” on Tangle, but the truth is that we WERE lighting, just not with film lights !  Instead we turned to practical lamps and natural lighting sources bounced through windows.  And we often were lighting by subtraction, using negative fill to increase the contrast, particularly in closeups.

Christine (Katherine McClements) lit by VistaBeam though bounce. Alexa frame grab

My gaffer Adam Hunter sourced some very interesting novelty light globes.  I’d seen them popping up in bars all over Melbourne.  It turns out they are a reproduction of the original Edison light globes.  They have a very long filament, and they have a very warm colour temperature, something close to 2300K.  Adam made up several faux prac lamps using these globes to create a new source of light which we could key with.  A sort of covered wagon with super soft stipple barndoors.

Gigi (Eva Lezzaro) lit by covered wagon baton. Alexa frame grab

Often day interiors were lit very simply.   We’d use multiple 12×12 ultrabounce frames  outside the windows and then drawing the appropriate shear curtain that had been designed into the set. Inside the locations, I would try and steer the staging towards taking advantage of the lighting though the windows and then adjust as I needed.

Most of the time it worked wonderfully.  The actors were so great to work with and often helped me out with small staging adjustments.  Lighting this way also made it far easier to light for some seriously long steadicam interiors, executed by the very excellent A camera / Steadicam operator Matt Temple.

A camera Focus Puller Cam Gaze and A camera operator / Steadicam, Matt Temple

We had some especially complex shots designed within Ally’s house that would not have been possible if the lighting hardware was inside the house.  It meant we could more or less see 360 deg and see everything.  If the camera happened to look out the window, it was usually blown out enough to disguise the ultra bounce lurking just outside and it meant I just had to try and avoid looking out the windows too often.  Of course if we wanted to see out the window, we’d move the ultrabouce.

Tangle also had some particularly large night exteriors that worked very well.  Gaffer, Adam Hunter had also introduced me to Cyan and Urban Vapour on Offspring, and we made a lot more use of it on Tangle.

Series producer Imogen Banks and Setup Director Emma Freeman were both wanted to return visually to the wonderful opening credit’s motif and start to use the house itself to frame the characters.  We also began to explore ways we could have reflections to shoot our characters with an obfuscated perspective.  Thematically, Tangle looks at the private underbelly of people’s lifes and using reflections was a great visual motif to represent their hard to focus on turmoil.

Christine (Katherine McClements) framed by her house. Available light only. Alexa Frame Grab

Using framing devices within the frame to position the characters, not only resonated with the fabulous opening credit sequence, it also helped to underscore how our lives are defined by the possessions around us.

Christine (Katherine McClements) framed by Parliament. Available light with Poly bounce. Alexa frame grab

Ally (Justine Clarke) is framed by her new house. Ultrabounce through windows. Alexa Frame Grab

Max (Blake Davis) and Chub (Dan Wyllie) have a chat. Available light. Alexa frame Grab

This would also mark the first time the series had shot with a large sensor. Well informed producer Imogen Banks was keen to explore using the then new Arri Alexa to shoot the third series after using the F23 (Bruce Young) and Super 16 (Lou Irving) in the previous two seasons.

In keeping with a highly naturalistic lighting style, we were also able to use the amazing ability of the Alexa to work with very little light.  Combined with ultra fast Master Primes, which open to T1.3, we were able to light entire scenes using a single kino tube.  Some out our exterior scenes are lit by the local council’s street lighting with only the barest supplementation from our own film lighting sources.

Max (Blake Davis) in a confrontation. Cyan 15 and Urban Vapor. Alexa frame grab

Christine (Katherine McClements) and Billy (Tony Rickards) Share a cup of tea. Lit entirely by pracs interior, and Cyan 15 on a small HMI in the background. Alexa frame grab

Our camera gear came from smaller boutique camera supplier Gear Head and Gear Head’s Michael Vlack did an outstanding job of looking after the production.

Although the lighting style was naturalistic, in many ways the staging style was more conventional.   Hand held was only occasionally used, mainly for scenes with heightened drama, but most of Tangle’s drama is subdued and very subtle.  Instead we tended to favour a more observed and lingering camera staging, trying to design coverage that was simplified and often more “film style”.  There are several single shot scenes where a simple camera move says a lot more than multiple shots could ever do.  We found it was a good way to subtly, but surely, ratchet up the tension.  It was a good pressure cooker approach.

We also improvised a new style of coverage, which we nicknamed “back-ting” or back acting.  We tried to build in quiet moments where characters are doing solitary things in their own little world.  These “backting” moments are the kinds of coverage you don’t often see.  We often chose to cover these moments by shooting the solitary characters from behind.  Sometimes, showing the back of an actor seemed to say more than shooting their faces ever could.

Joe (Kick Gurry) shows us some of his best "backing". Alexa Frame grab

We found an amazing house in Sandringham, by the ocean that offered a whole new set of possibilities.  Everyone liked the fact that is was somewhat more rundown.  “Ally” had been forced to downscale after the unexpected death of her husband “Vince” in series 1 and the slightly downtrodden but with character house was a perfect fit.  It had a sort of beach Californian bungalow style to it and even though it was amongst relatively affluent houses, it certainly didn’t feel that way.  It did have amazing character though.

One of Tangle’s recurring characters, Christine, played by Katherine McClemments spends a lot of time at her now disgraced husband’s former place of work the Parliament of Victoria.

Over the course of the series, she would visit Parliament several times. For me, this would mean shooting for the first time at the parliamentary buildings of Victoria, where we were only able to secure a single day of shooting for the entire season.  Shooting on a very long Saturday, we had to shoot scenes for both the first and second blocks, with second block director Michael J Roland kicking off the morning before Emma Freeman returned to complete her parliament scenes from the first block.

Christine (Katherine McClemments) and Ally (Justine Clarke) share a brew. Lit by VistaBeams through grid cloth. Alexa frame grab

Tangle was a very special set to be a part of.  The cast are truly outstanding, from the youngest of the “kids” all the way up through the “grownups”.   The cast all know they are working on something really special and they are a very tight knit group.  It was special to invited to join the Tangle family and to work on something everyone think’s is pretty special.

Thanks to Craig Barden for his fantastic 2nd unit work and especially to Kim Vecera from Foxtel for commissioning the series in the first place. And the rest of my wonderful crew, Grip John Smith, focus pullers Cam Gaze and Grant “Grunter” Sweetnham, Ben Bryan my loader, and Kat Schachte on video split.

Watch the trailer

Posted in Production | Tagged , , , , , , , , , , , , , , | 1 Comment